| Jul-20-17 | | Ultra: Interesting game. Black looks to be coming back but really isn't. |
|
Jul-20-17
 | | offramp: 
click for larger view
17. Qxb7 was a bit of a surprise. Is it really the best move? |
|
| Jul-20-17 | | The Kings Domain: Amusing win by the tragic American master. |
|
| Jul-20-17 | | RookFile: Black's counter-attack sure looked dangerous. |
|
| Jul-20-17 | | ChessHigherCat: <offramp> 17 Qxb7 looks a cheapo pawn grab but I think he was hoping for Rb8 followed by Qe4 and Nc6 to force the trade of black's LSB, which eventually proved so bothersome on the long diagonal <I>(registered trademark) has spoken |
|
| Jul-20-17 | | cunctatorg: Is 19... Rb6 (surrendering the pawn at h6 and the King's fortifications) the "relatively best" move? I guess so... |
|
| Jul-21-17 | | kevin86: Mate to come soon. |
|
May-29-22
 | | KEG: A typical Pillsbury crush, featuring his beloved Ne5 maneuver. Pillsbury had first played Napier at Buffalo 1901 where he defeated him twice. This third victory over Napier, however, was to be Pillbury's last. In their final two games, Napier came away with a win and a draw before Pillsbury's unfortunate early demise. Pillsbury's early death was a terrible loss. He and Tarrasch would each have made good match opponents for Lasker during the 1890's. But Lasker chose not to play another World Championship match until 1907, did not play Tarrasch until 1908 (when Tarrasch was past his prime) and never played a match with Pillsbury. Quite a shame. I would have picked Lasker in both matches, but would not have made him a prohibitive favorite. Lasker's matches with Marshall (1907), Lasker (1908) and later against Janowski were romps. (Schlechter came close to beating Lasker in 1910, but only because the match was limited to ten games). At the time this game against Napier was played, I would have ranked Pillsbury as one of the five greatest players of all time (Morphy, Steinitz, Tarrasch, and of course Lasker being the others). I think Pillsbury would have had major trouble against Capablanca and the mature Alekhine (and probablly Rubinstein as well), but it is sad that we never got to see such contests. In the game at hand, Pillsbury never let Napier recover from his weak 4th move. The game was probably not theoretically lost for Napier until his poor 14th move, but once Pillsbury set up his favorite Ne5, he was probably unstoppable against human opponents. 1. e4 e6
2. d4 d5
3. Nc3 Bb4
4. exd5
Nearly everybody plays 4. e5 here, but Pillsbury--like Steinitz, Blackburne, and Zukertort--preferred the text, which leaves the following position in which White has only a small edge: 
click for larger viewModern commentators are not kind in their evaluation of 4. exd5: "A move that renounces all claims of maintaining the initiative." (Gligoric) Capablanca's loss in Game 1 of his 1927 World Championship match against Alekhine did nothing to bolster the reputation of 4. exd4 (a semi-Exchange Variation of the French). But I reckon that is attacking players such as Pillsbury and Zukertort were around to read the trashing commentary on 4. exd4, they would smile and then go on winning with this move. As a purely theoretical matter, the text is not significantly worse than the almost universally played (today) 4. e5. And the text is quite good indeed if Black responds as Napier did: 4... Qxd5?

click for larger viewThis is bad for a host of reasons, including the obvious point made in the Tournament Book that it loses time. Not surprisingly, 4...exd5 is almost always played here. It would be interesting to know what Napier was thinking. Pillsbury is just about the last player against whom I would venture the text. The game is probably far from lost for Black at this point, but now the Pillsbury steamroller went into action, and Napier was quickly crushed. To some extent, from here Pillsbury's game almost seems to play itself: 5. Nf3 Nf6
6. Bd3 Nc6?
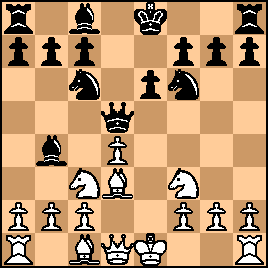
click for larger viewA novelty by Napier, and not a good one. 6...0-0 or 6...b6 were the best chances to try to salvage Black's already questionable position. 7. 0-0 Qd8
8. Ne4
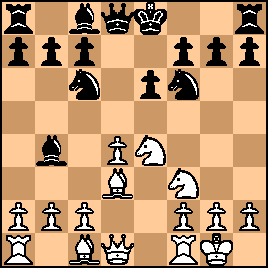
click for larger viewPillsbury was almost certainly already planning on Ne5 and f4 with his classic King-side attacking formation that had brought him countless victories (often in the QGD). The old adage that when Pillsbury as White gets his Knight to e5 the game is over was about to be demonstrated once again. |
|
May-30-22
 | | KEG: Post II
8... Be7
Trading Knights immediately might have been a decent idea, but in this sort of position against Pillsbury it probably would not have changed the outcome. 9. c3 0-0
10. Qc2
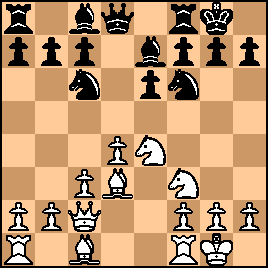
click for larger viewA patented Pillsbury set-up for a King-side storm. The Tournament Book noted that Black had lost time. Among other things, with his Knight on c6, Napier had blocked the chance to obtain counter-play with c5. By the time that maneuver became available for Napier, the Pillsbury attack was in full swing. 10... h6
This was rarely a successful idea against Pillsbury, but Napier had nothing better (10...NxN 11. BxN h6 leads to similar problems). Napier was not quite lost here, but he had no reason to expect a long day at the office. 11. NxN+ BxN
12. Qe2
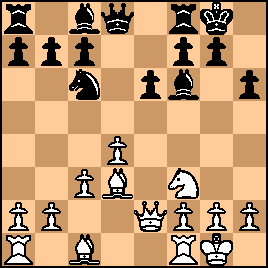
click for larger viewI would have been looking at 12. Bf4 or 12. Re1 or 12. Rd1 for White. But Pillsbury knew what he wanted to do in this sort of position and probably not have wanted to listen to my musings on how to fuel his attack. 12... Ne7
Re-positioning the Knight was a decent idea, but things were looking dangerous for Black and he perhaps should have tried to fight for counter-play with 12...e5. After the text, it was Pillsbury time.
13. Ne5
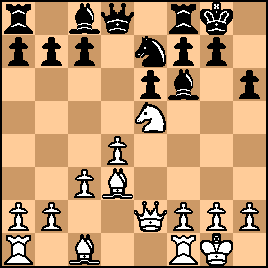
click for larger viewLesser mortals might have tried 13. Re1 or 13. Rd1 or 13. Bf4. But Pillsbury loved to play Ne5 in these sorts of games. He probably already considered the game just about over 13... Nf5
Especially against Pillbury, 13...BxN might have been a good choice (though once Pillsbury got a pawn on e5 Black would still have had his work cut out for him if he hoped to survive. 14. f4
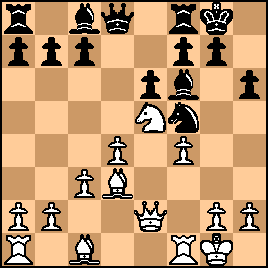
click for larger viewOnce again, Pillsbury would likely not have been interested in discussing alternatives such as 14. Bf4 or 14. Rd1. He had now obtained his favorite alignment for a King-side assault and almost certainly not have sought advice on how to handle his favorite kind of position. 14... Bd7?
After this lemon, Napier was probably lost. In fairness, he also would probably not had much fun had he tried one of the myriad of alternatives (e.g., 14...Be7; 14...Nd6; 14...g6; 14...c5 [what I would probably have played, preferring to go down fighting]). 15. g4

click for larger viewThere were other ways to continue the attack, but--yet again--I doubt Pillsbury would want to hear from me on this. 15... Nh4?!
When I first played over this game, I was thinking of 15...Nd6, but then got crushed by my computer after 16. g5. Probably the best try wouldhave been 15...BxN, but I still wouldn't fancy anyone's chances against Pillsbury. 16. Qe4!
16. g5 was also strong. The text was very hard to meet, and goes a long way towards explaining Pillsbury's 12. Qe2. 16... g6

click for larger view |
|
May-30-22
 | | KEG: Post III
17. Qxb7
<offramp> reasonably wonders whether this move is best for White, while <ChessHigherCat> not unreasonably says is "looks like a cheapo pawn grab." Having satisfied myself that the text is indeed best, all I can do is make two observations: (i) as my teacher Susan Polgar often reminds me, "a pawn is a pawn;" and (ii) even after this pawn grab, White's attack remains ferocious. Also, I can find nothing better.
17... Rb8
18. Qe4
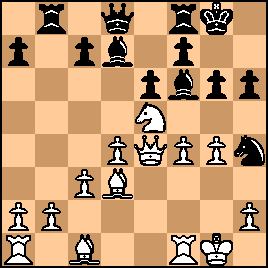
click for larger viewNapier was still under siege on the King-side, and Pillsbury now had a pawn in hand. His 17. Qxb7 keeps looking better and better, doesn't it! 18... BxN?
After this Napier was little more than cannon fodder for Pillsbury. He had a gaggle of better moves: e.g., 18...Rb6; 18...Re8; 18...c5; 18...Bc8. In fairness to Napier, none of these alternatives were likely to save the day. But after the text, Pillsbury was unstoppable. 19. fxB Rb6
<cunctatroy> wonders whether this move was truly best, concluding: "I guess so." This is sad (for Napier) but true. Nothing else (not even 19...Bc8) seems to help. Especially with Pillsbury playing White. 20. h3
Pillsbury's position was so good he even had time for this (perhaps unnecessary) prophylactic measure. 20. Qe2 and 20. Bc4 were clearly very strong. And Pillsbury could also have won with the simple-minded 20. Bxh6 (20...Bc6 21. d5 Qxd5 22. QxQ BxQ 23. BxR KxB 24. c4 which would leave him up a pawn plus the exchange with his attack still in progress). The position was (after 20. h3):
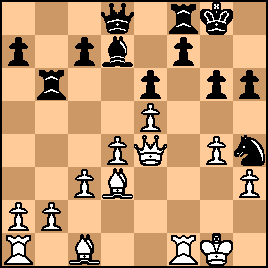
click for larger view20... Bc6
Trying to create an attack of his own. It is interesting to see how easily Pillsbury brushed off Napier's attacking scheme while keeping his own threats very much intact: 21. Qe2 Qd5
21...g5?! had its points, but Napier had--not unreasonably--decided to live or die based on the attack he was set to pursue. 22. Kh2!
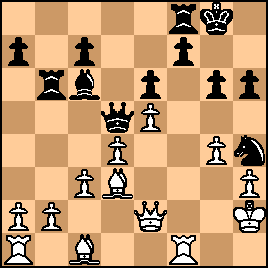
click for larger viewA wonderful move that stopped Napier in his tracks. Things now looked grim for Napier. And matters only got worse after his next effort: 22... Ba8?
Hopeless. To have even a prayer, Napier had to play 22...g5?! After the text, Pillsbury gobbled up another pawn while advancing his decisive attack. 23. Bxh6
Another pawn grab you say. Well, yes. But a murderous one. 23... Rfb8
I have no more ideas for Napier. He was at this point a dead duck. 24. b4
24. b3 also wins, but the text was most forceful. 24... Qc6

click for larger view25. Kg3!
Pillsbury had many ways to win here, but I like 25. Kg3, an elegant way to show the futility of Black's efforts at counterplay: 
click for larger view |
|
May-30-22
 | | KEG: Post IV
25... Ng2?!
Sacrificing his Knight with 25...Nf5+ might have allowed Napier to carry on a bit longer, but that would not be much better than resignation. After 25...Ng2, the position was:
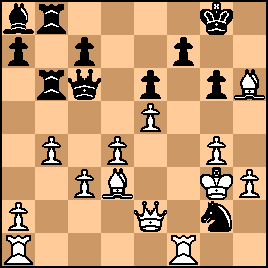
click for larger view26. Qf2
26. Qd2 or 26. Rac1 or 26. Rad1 might have been the easiest way to wrap up the game. But perhaps Pillsbury foresaw what was about to transpire, the position now being: 
click for larger view26... Qd7?
The fastest way to lose. 26...f5 was the only way to prolong the game for even a little while. 27. Qf6
Ouch!

click for larger viewMate next move cannot be prevented.
The game is a delightful display of Pillsbury's tactical and positional prowess, though here not against very strong opposition (Napier hardly doing himself justice in this encounter). 1-0 |
|
|
|
|


