| keypusher: Following from Sally’s second diagram, in <Chess Secrets I learned From the Masters>, Lasker writes after 29.Ra6+: <In conjunction with the following sacrifice of a pawn and the exchange, this is no doubt the longest combination I ever conceived.> SF confirms that the combination does not work and should have led to a draw. Which is a shame, because it’s a magnificent combination. But I think there’s a practical lesson to be learned, a <Chess Secret To Learn From An Engine>: the chances that even a strong master will be able to accurately calculate OTB a combination of the depth and complexity of Lasker’s here are very small, and it’s especially risky given that: (i) all the sacrifices occur near the beginning and the payoff comes many moves later (ii) Marshall has the furthest outside passed pawn, on the a file, so there are a million pawn races to calculate, and quite a few lines where White risks defeat. I think one reason Lasker was drawn to the sacrificial line is that his rook on a3 is a little awkwardly placed; it has nowhere to go on the third rank and doesn’t have many squares available on the a-file either. As Lasker notes in <Secrets>, earlier he could have played 26.c4 and his rook would have been more mobile. But he didn’t want to give Marshall’s knight the chance to land on d4. Chess is a hard game! Back to the combination: 29.Ra6+ Nb6 30.f6(?) (to set up a pawn breakthrough on the kingside) 30….gxf6 31.a4(?) d5 32.a5 Kb7 33.axb6 (forced, but the SF eval is now triple zeroes) 33….Kxa6 34.bxc7 Rc8 35.Ke3 Rxc7 36.Kd4 Rb7 37.Rxb7 Kxb7 38.Kxd5 c3 39.h4 
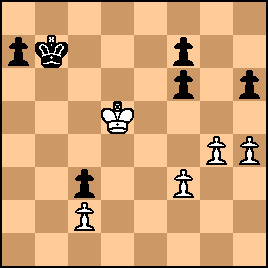
click for larger view39….Kc7?
No comment from Lasker, but 39….f5!! draws.
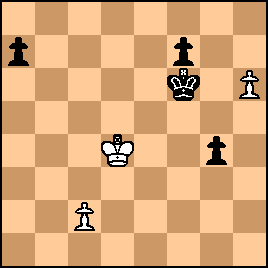
If 40.g5? h5!, White is looking at a lost queen ending after 41.Kd6 or 41.Ke5 a5. If 40.h5 fxg4 41.fxg4, 41….f6 is a straightforward draw after 42.Ke6 a5 and both sides queen. If 40.gxf5, Kb6 is very tricky. White can draw with 41.f6 or 41.Ke5 (41….a5 42.Kd4!) but 41.Kd6 loses a crucial tempo and loses after 41….a5. (Incidentally, …f5 also would have drawn on move 38. Lasker’s comment on this possibility is telling: <[A]fter 39.gxf5 Kb6 40.Kxc4 it is doubtful whether [Black] could have held the ending because White has a good many waiting moves so that he can always drive Black out of the opposition if necessary.> Obviously, he doesn’t see a clear win…so why did he embark on such a risky combination?) After 39….Kc7?, the game continued: 40.h5 Kd7 41.Kd4 Ke6 42.Kxc3 f5, reaching the position in Sally’s third diagram. And as Sally noted, 43.g5! wins. But it’s worth pointing out what a near-run thing it is. 43….hxg5 44.h6 Kf6 45.Kd4 g4 46.fxg4 fxg4, reaching this position: 
click for larger viewLasker writes: <Only one White and one Black Pawn can be stopped by the opposing King, so that it depends on the number of moves the other Pawns need to queen whether either side can win. It is White’s turn to move, but one move after his Bishop’s pawn queens, Black’s Rook’s pawn also gets a Queen, as the white King can be forced over to the King’s wing by the advance of the Knight’s Pawn. The hallucination I had was the idea that Black would even succeed in queening with a check, because he could first run with the Knight’s Pawn and make my King wind up on the first rank. What I should have clearly realized is this: After 47.c4 g3 48.Ke3 a5, the two pairs of passed pawns are located exactly alike as far as the distance from the queening squares is concerned, but it is my move. Therefore I must certainly be able to queen my Pawn first, and if there is a variation in which Marshall queens with a check, there must also be a symmetrical variation in which I can do the same.> However, as he explains, with a minute to go before the time control, he failed to see this continuation. Which, I think, just goes back to the same point: practically speaking, the chances that he would calculate his grand combination perfectly, or execute it flawlessly, were not good. | 


