|
< Earlier Kibitzing · PAGE 2 OF 2 ·
Later Kibitzing> |
Apr-18-18
 | | perfidious: <keypusher....Lasker's 59. Nc6(?) wins Black's last pawn...looks like he forgot his own maxim: when you see a good move, look for a better one!> Perhaps Lasker had not yet learnt that lesson. (laughs) |
|
Apr-18-18
 | | KEG: Post III
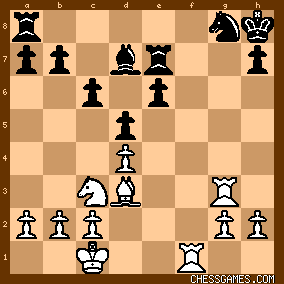
Lasker's continuation after Pillsbury's 9...RxB was brutal and should have led to victory without the lengthy ending the game actually required. 10. Qh5 g6
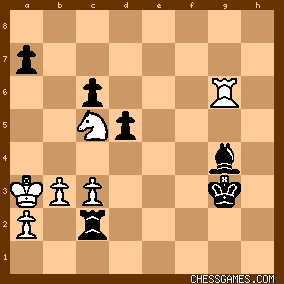
As keypusher has noted, Black is in big trouble here. 10...Rh6 was probably his best chance here, but after 11. Qf7+ Kh8 12. Qf1! his position would likewise have been in the last throes. The position after 10...g6 was:

click for larger viewLasker's pieces, as keypusher has pointed out are all active while Pillsbury's army is not. But how to continue? Lasker's move here was pretty. 11. Nxg6!
"The point of the combination begun on White's 8th move." (Reinfeld-Fine). 11... Qe8
Sadly for Black, this is the best move at his disposal. As Schlechter noted in his commentary, 11...hxN loses to 12. Bxg6! if then--as pointed out by Schlechter and Rosenthal--12...RxN 13. QxR+ Kh8 14. Qh6+ [White can also win here with Reinfeld-Fine's 14. Qh6+ (threatening Rf7) Qg8 15. Qh5+] Kg8 15. 0-0 and wins. If here 15...Qe8 then, to quote keypusher again, 16. Rf3 forces mate. 12...Bb4 may seem to be an alternative in the above line, but keypusher has nicely demonstrated how White can crush that move: 12...Bb4 13. Qh7+ Kf8 14. Rf1!! The position in this line by keypusher would then be: 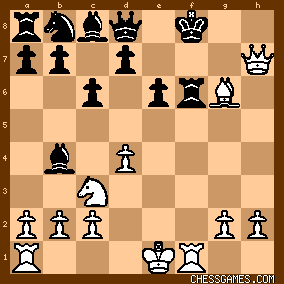
click for larger viewTo quote keypusher yet again: "Black is, believe it or not, defenseless": 14...RxR+ 15. KxR Qf6+ (or 15...Qe8) 16. Kg1 "and there is no answer to the threat of Rf1." What a gorgeous line. Bravo keypusher. <keypusher> To return to the actual game after Pillsbury's 11...Qe8: 12. NxB+ QxN
13. 0-0-0
13. g4 would also have been strong here. Yet another winning line would have been 13. Ne4. Reinfeld-Fine say that 13. Ne4 would have been "less convincing" because of 13...Rg6 (best but insufficient to save the game would be 13...Rf5) but White would then win with 14. 0-0. Indeed, even after Reinfeld-Fine's inferior 14. Ng3, White still has a win after their proposed 14...Rf6 (14...Rf6 was the best Black has here) 15. 0-0-0. 13... d5
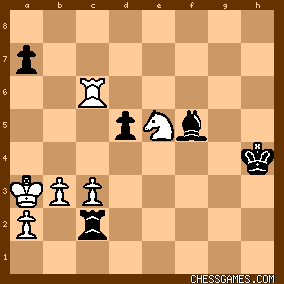
"Black must prevent Ne4." (Reinfeld-Fine). The position was now: 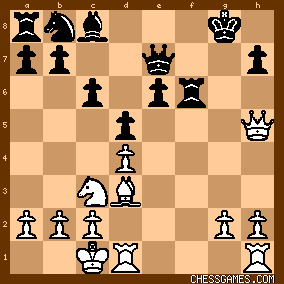
click for larger view14. Rde1
This move is in fact one of four possible winning lines Lasker had at his disposal here. The other three winning methods were: A) The recommendation of Schlechter and Rosenthal: 14. Rde1 (even stronger than Lasker's move) which wins after 14...Nd7 15. Rf3 (Rosenthal) or 15. g4 (Schlechter). B) Even better than the Schlechter/Rosenthal line is Reinfeld-Fine's 14. Rhf1 (bengalcat aptly notes on this site that this move "merits further exploration") 14...Nd7 15. Ne2 (even stronger than Reinfeld-Fine's 15. Rf3). C) Perhaps best of all is keypusher's suggested 14. g4 which wins after 14...Nd7 15. g5 Rf7 16. g6 hxg6 17. Rhg1 Rg7 18. Rxg6 Nf6 (if 18...RxR 19. QxR+ Qg7 20. Qxe6+) 19. Qg5 RxR 20. BxR Qg7 21. Rf1 Nh7 22. Qd8+. My only quibble with this fine line by keypuser is that Black can offer stronger--but ultimately futile--resistance with 14,,,Qg7 or 14...e5. Back to the game. After 14. Rde1, Pillsbury played: 14... Nd7
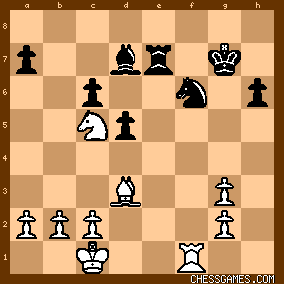
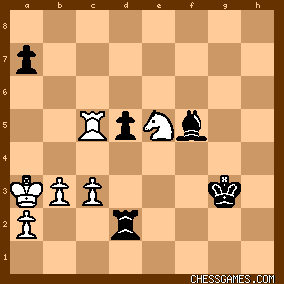
This left the position as follows:
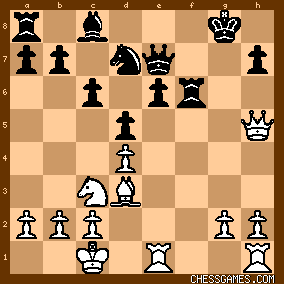
click for larger viewMaterial is even, but Lasker's strongly posted pieces and Pillsbury's severe weaknesses (e.g., his backward e-pawn, his undeveloped Queen side; and his vulnerable King should have led to defeat without much further ado. But beginning here, as I will discuss in my next post on this game, Lasker began to falter, allowing Pillsbury to reach an endgame in which he had good chances of saving the game. |
|
Apr-18-18
| | KEG: Post IV
Lasker's fine play had yielded an overwhelming and almost certainly winning position. But after Pillsbury's 14...Nd7 Lasker let Pillsbury back in the game: 15. Re3
This is good enough to preserve a strong edge, but better still and more immediately decisive would have been 15. Rhf1. Lasker eventually gets a Rook on f1, but three moves too late. Teichman and Reinfeld-Fine recommend 15. g4, but after 15...Nf8 Black has better chances than after Lasker's actual move. 15... Rf7
15...Kh8 was much better.
16. Rg3+
After Pillsbury's last weak move, Lasker had a clear win with either the text or with the immediate 16. Rf1 16... Kh8
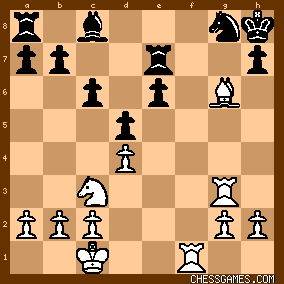
Black has no choice here. As Reinfeld-Fine have noted, if 16...Rg7?? 17. Qxh7+ (exploiting the pin) wins immediately. The position after Pillsbury's 16...Kh8 was:

click for larger viewIt certainly appears that Lasker is about to close out the game, but: 17. Bg6?
This error (which undid most of Lasker's brilliant play to this point) is not identified in any of the commentaries I have found on the game. As Pillsbury quickly demonstrates, Black can now get back into the game. The winning move here was 17. Rf1!, since after 17...RxR+ 18. BxR Black is helpless, e.g., 18...Nf6 19. Qe5 Bd7 20. Ne2 Rg8 21. Rf3 Rg6 22. h4 Qg7 23. Qb8+ and Black's resistance soon crumbles. 17... Rg7
Pillsbury's only move, but perhaps sufficient to hold the game. 17...Rf6 would lose to Reinfeld-Fine's 18. Nd1, though after 18...Nf8 (18...Qg7 was slightly better) White wins with 19. Bd3 but not with Reinfeld-Fine's 19. Qh4 which allows Black to escape after 19...NxB 18. Rf1 Nf6
19. Qh4 Ng8
20. QxQ
"White has no choice but to exchange Queens or submit to a draw." (Teichmann). 20... RxQ
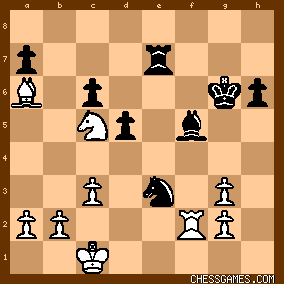
This left:
click for larger view"A pity! Nothing has come of the fine attack. The ending is favorable for White." (Teichmann). Teichmann has said it all. Other commentators (e.g., Schlechter) think Lasker still has a win here. In subsequent posts, I will defend Teichmann's assessment. One positive note concerning Lasker's error on move 17 is that it allows us to enjoy the wonderful endgame that follows. 21. Bd3
Schlechter states that Pillsbury's backward e-pawn here should seal his doom. I will try to show that his position was probably not beyond salvage. 21... Bd7
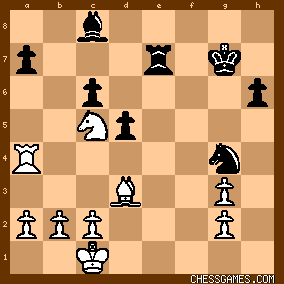
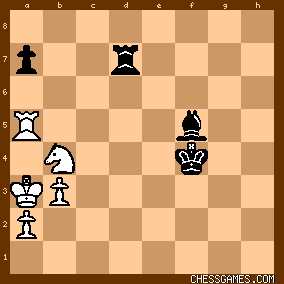
As Hoffer has pointed out, 21...e5? was not feasible. But his 22. dxe5 would have allowed Black chances after 22...Bd7. Best and crushing for White after 21...e5? is 22. Rf8! (22...Rg7 23. Bf5) The position after 21...Bd7 was:
click for larger viewI will begin my analysis of the fascinating endgame that ensued in my next post on this game. |
|
Apr-18-18
| | KEG: Post V
The endgame here was a wonder to behold, but neither contestant played flawlessly. Perhaps I should correct any misimpression I may have created in my prior posts. Much of Lasker's play was scintillating. But this was a VERY difficult endgame, and even Lasker went astray more than once. That being said, Lasker's play here was for the most part of the highest order, and Pillsbury (although he too erred more than once in this complex ending) also produced much play here of the highest and most creative order. 22. Nb1
"A deep maneuver, the Knight is to be plaued to f3 whence it is ready to enter at e5 or g5 with great effect." (Teichmann). "A subtle maneuver aiming at the capture of the b-pawn.' (Schlechter). Beginning a profound maneuver. Black's weak king-side and backward e-pawn are sufficiently troublesome to give White the necessary time to bring his Knight to an effective post." (Reinfeld-Fine). "From move 22 Lasker moves his Knight 8 times in 10 moves." (ugahibu). A great example of Lasker of how to improve a poorly placed piece. Within five moves, the Knight goes from the poor square of c3 to threatening mate by Nf7." (GrahamClayton). I share the admiration of all of the above commentators for the Lasker's creative approach and lovely "quiet" move. But I have a suspicion that the simpler and faster way to bring the Knight into the game with 22. Ne2 may be even better than the text. After Lasker's remarkable 22. Nb1, the position was: 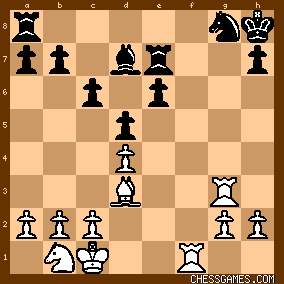
click for larger view22... Rae8
This move by Pillsbury was almost certainly best. As Hoffer pointed out, much as Black wants to play e5 here, it is as yet premature: 22...e5 23. dxe5 Rae8 (better than Hoffer's 24...Rxe5?
24. Rf7 winning) 24. Nd2 leaving White better placed than in the game. 22...Rg7? analyzed by Reinfeld-Fine in their commentary on this game loses immediately to 23. RxR (far superior to Reinfeld-Fine's unduly slow 23. Nd2) KxR 24. Bxh7! and White has won a pawn in light of 24...KxB 25. Rf7+. 23. Nd2
Lasker calmly proceeds with his plan to invade with this ventursome Knight. 23... e5
"Now he must advance this pawn for 24. Nf3 would prevent it for ever." (Hoffer). "Else Nf3-e5 will leave Black's e-pawn permanently backwards." (Reinfeld Fine). 24. dxe5 Rxe5
25. Nf3 Re3
26. Ng5
Threatening mate in 1:

click for larger view26... RxR
27. hxR h6
Reinfeld-Fine erroneously claim that 27...Re7 loses. In fact, that move may be even stronger than the text: 27...Re7 28. Bxh7 (28. Nxh7 was even stronger) 28...Kg7 and Black, though down a pawn (i.e., White's doubled g-pawn) would have excellent chances of holding the position. On the other hand, the awful 28...RxB?? considered by Reinfeld Fine does indeed lose to 29. NxR, especially after 29...KxN?? (29...Kg7 is the only even forlorn chance here) 30. Rf7+. 29. Nf7+ Kg7
30. Nd6 Re7
30...Rf8 was somewhat better.
31. Nxb7
This left:

click for larger view"Although White has won a Pawn, the win is by no means easy because of his doubled pawn." (Reinfeld-Fine). "White's deep play has now been rewarded with material gain, and owing to his otherwise unfavorable position, Black can never [an overstatement in my view--KEG] recover. But...the game yet requires the utmost skill to win. Lasker, however, is equal to the occasion and adds another specimen to his long list of remarkably fine endings." (Teichmann). So now Teichmann has joined all the other commentators and decides that--at least as of this point-- Pillsbury is lost. I will consider whether that assessment was correct when I continued my analysis in my next post on this game. |
|
Apr-18-18
| | KEG: Post VI
Apologies for misnumbering the moves at the end of my last post. What I intended was: 27. hxR h6
28. Nf7+ Kg7
29. Nd6 Re7
30. Nxb7
Sorry for any confusion I may have created.
But back to the game:
Could Pillsbury have saved the game against best play after 30. Nxb7. Let's see: 30... Nf6
31. Nc5
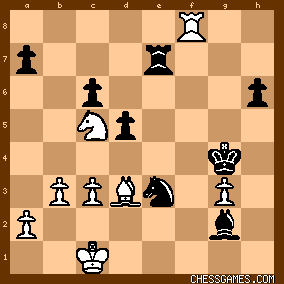
The position was now:
click for larger view31... Bg4?
As Schlechter and Hoffer both correctly noted, 31...Bc8 was better. It is far from clear that Lasker can win against that defense: 31...Bc8 32. Kd2 Nh5 33. Rf3 Bg4 34. Re3 RxR 35. KxR and Black is still very much alive despite his pawn minus, especially since White's extra pawn is a doubled pawn. Also good in this line seems to be 34...Kf6 35. c3 RxR 36. KxR Kf6 For this reason, I still maintain that the ending was not lost for Pillsbury until 31...Bg4? Rosenthal in the Tournament Book claimed that 31...Nh5 was best for Black, but this was effectively refuted by Reinfeld-Fine: 31...Nh5 32. NxB RxN 33. g4 Nf6 34. Bf5 (even stronger would be 34. Rf4) Rf7 (34...Re7 was much better) 35. Rf3. 32. Rf4 Bc8
33. Ra4 Ng4
This was best. As Reinfeld-Fine pointed out, 33...Rh5 gets crushed by 34. g4 Nf6 (34...Ng3 was better but unavailing) 35. Bf5! The position after 33...Ng4 was:
click for larger viewThings are certainly looking good for Lasker here, but beginning at this point--whether because of time-pressure or otherwise, he faltered several times such that by move 42 it was Pillsbury who had the better chances. I will discuss how this came about in my next post on this game. |
|
Apr-18-18
| | KEG: Post VII
Although sitting pretty after 33...Ng4, Lasker--astonishing to relate--played a number of weak moves between move 34 to move 42 and for a time handed the advantage to Pillsbury. Was time pressure a factor? I can find no direct evidence of this. What we do know is that the time controls at Paris 1900 came at moves 30, 45, and 60. Interestingly, Lasker also erred on move 59 (missing a faster win and requiring him to play on for another 25 plus moves). What can we conclude from all this? Just that time pressure MIGHT have been a factor. Back to the game.
34. Ba6?
This moves sets a transparent trap that might have fooled a lesser player (34...BxB? 35. RxN+ winning a piece). But the opponent was Pillsbury, someone highly unlikely to make a childish mistake. Thus, Lasker should have proceeded with his winning plan with 34. Kd2. After the text, Pillsbury had a fighting chance. 34... Bf5
35. Rf4?
Lasker is again tilting at windmills. 35. Kd2 returning to his original plan of attack was best, though perhaps no longer clearly sufficient to win. 35... Ne3
The progress Pillsbury is made is apparent from the following diagram: 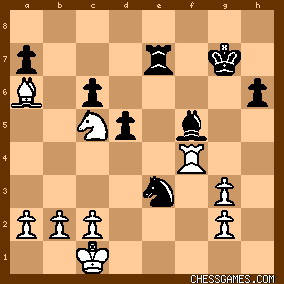
click for larger view36. c3
Another second-best move. 36. Bd3 was best.
36... Kg6
37. Rf2
Still not playing like the Lasker we have all come to know and respect, especially in the endgame. 37. Kd2 was better. The position was now:
click for larger viewHaving fought his way back to a playable position with excellent chances for a draw [and then a replay with White], Pillsbury erred with: 37... Be4?
37...Nc4 was the road to safety for Pillsbury (e.g., 37...Nc4 38. BxN dxB 39. Kd2 Re5). Now, Pillsbury is in trouble again. 38. b3
"So as to give the King access to the Queen's wing pawns." (Schlechter). 38. BxN looks like a possibility for White here, but was--rightly or wrongly--shot down by the commentators: "White rightly renounces the holding on to the won pawn and makes the game much clearer by giving it up. After 38. NxB dxN Black has many chances because of the passed pawn." (Schlechter). "38. NxB dxN would give Black dangerous passed pawns. The text enables White, at the cost of a pawn, to advance his King on the Queen side." No doubt about it, Lasker's 38. b3 avoided the risks of the (quite playable in my view) 38. BxN and also gave Lasker chances to renew threats on the weak points in Black's position. But a pawn is a pawn and Lasker might well have endured the risks of a passed Black e-pawn in order to maintain his pawn. Perhaps strongest for White here was 38. Rf8.
But Lasker, on any reckoning, still had serious winning chances and definitely the better position after 38. b3. But this advantage did not last long. 38... Bxg2
38...Nf5 was another possibility for Pillsbury.
The position was now:

click for larger view39. Bd3+?
Incredible--especially from Lasker. 39. Bb7 attacking the weak underbelly of Black's Queen-side was unquestionably best. The text, by contrast, gave Pillsbury a clear road to equality, as I will discuss in my next post on this game. |
|
Apr-18-18
| | KEG: Post VIII
After Lasker's 39. Bd3+ the position was:

click for larger viewThe following moves--perhaps resulting from the 45-move time control--were surprisingly weak. 39... Kg5?
Missing his chance and walking into potential trouble. Best and sufficient for equality was 39...Be4! as pointed out by Reinfeld-Fine. Black is then fine no matter how White might respond. Thus: A) 40. BxB+ dxB 41. Re2 (or 41. Kd2) Nd5 (or 41...Nf5) 42. Kd2 (42. c4 was better, but only leading to equality) Nf6 ; or 42. Rxe4 RxR 43. NxR Kf5 44. Nd6+ Kg4 and Black now is slightly better after 45. Kd2 or after Reinfeld-Fine's inferior 45. c4 Ne7 46. Ne4 (46. Kd2 was slightly better) Kf3 B) 40. NxB dxN 41. Be2 Nd5 [and not Reinfeld-Fine's 41. Bb1? Nd5 42. c4 (not 42. Kb2? Kg5 and Black wins) Nc3 and Black has much the better chances. By contrast, 39...Kg7 as recommended by Rosenthal in the Tournament Book was asking for trouble. Rosenthal's proposed line after 39... Kg7 and his analysis was badly flawed: 39. Kg7? 40. Kd2 Bh3 41. Re2? (41. Rf4 was best) 41...Nf5? (Black would be for choice after the far better 41...Nf1+) while after 41...Nf5? White would again have the edge after 42. Rh2 (as opposed to Rosnethal's claim that the game would then be "equal." The above analysis--including the errors made by commentators who had all the time in the world to examine the position--shows how difficult this endgame truly was. Anyway, back to the game after 39...Kg5?
40. Rf8 Kg4
40...Be4 was better.
The position was now:
click for larger view41. Rg8+
Another astonishingly weak move by Lasker. 41. Rh8 was best and Black would again have been hard pressed to defend his weaknesses. 41. Rf6 was also far better than the text. Lasker now has lost any advantage he had enjoyed. 41... Kf3
42. Rg6?
Lasker could still have maintained the balance by playing on the Queen-side with 42. a4 or 42. b4. After the text (42. Rg6?) the position was:

click for larger viewAll of a sudden, Pillsbury is anyone has the better chances. But from here, Pillsbury (time pressure with the move 45 time control looming?) erred repeatedly leaving Lasker in a winning position which--this time--he pressed to victory. The manner in which Lasker outplayed Pillsbury from the above-diagrammed position will be discussed in my next post on this game. |
|
Apr-19-18
| | KEG: Post IX
Whatever time-pressure of other problems had been plaguing Lasker seemingly vanished after his poor 42nd move, and from here to the end his play was fabulous, the only hitches being a few instances in which--after outplaying Pillsbury and obtaining a won game--he missed opportunities to end the game faster (most notably on his 59th turn as the move 60 time control neared). Pillsbury, perhaps deciding to play for a win as of the time of the last diagrammed position in my prior post, gave Lasker some chances which the World Champion ruthlessly exploited. 42... Ng4
43. Bf5 h5
44. Rg5

click for larger view44... Re1+
Pillsbury's only even remote winning chances here lay in 44...Nf6. Lasker would then have had to fight to avoid loss. 45. Kb2 Rh1
Pillsbury had many roads to equality here: i.e., 45...Kxg3; 45...Nf2; 45...Nf6. But he plays for more and gets into immediate trouble. 46. Bg6!
With the 45-move time control in his rear-view mirror, Lasker recognizes the potentially winning themes: (a) eliminate Pillsbury's h-pawn; (b) trade off Bishop for Knight (leaving him in a position in which his Knight is better than Pillsbury's Bishop); and (c) shift the focus to the Queen-side, where Pillsbury was vulnerable. 46... Kxg3?
Pillsbury either didn't see the dangers ahead or was intend on seeking a win whatever the risk. 46...Ke3 rushing to the Queen-side was essential. A possible alternative to save the Knight was 46...Nf2. After the text, Pillsbury was lost, and Lasker gave him no chances to recover from here to the end of the game nearly 40 moves later. 47. Bxh5
Eliminating the h-pawn and pinning Pillsbury's Knight so it can be traded off on the next move. 47... Bf3
This site gives this move as 47...Bh3, but all of my sources--including the Tournament Book--give the move as 47...Bf3. If Pillsbury did indeed play 47...Bf3 here, Lasker would still have a win with 48. BxN. But I suspect Lasker would likely have played what would then have been the stronger 48. Be8, another factor that leads me to conclude that 47...Bf3 was the move Pillsbury actually played. 48. BxN!
Recognizing that his Bishop will be superior to Pillsbury's Knight in what follows. 48... BxB
He might also have played the (slightly better) intermediate move 48...Rh2+. 49. Rg6
49. a4 was another strong move here. The position was now: 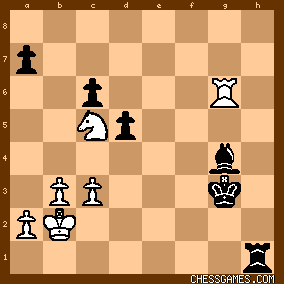
click for larger view"What with the King's wing safely liquidated, White's Queen's-wing superiority can no longer be denied." (Schlechter) "White has an advantage which assures the win of the game; the Black King is out of play, the Knight is more useful than the Bishop, and the White King is in the proximity of the undefended Black pawns." (Hoffer) 49... Rh2+
50. Ka3 Rc2
50...Kf4 trying to rush the King to the Queen-side was perhaps the only real chance for Pillsbury here. The text only makes things worse. (Apparently, some scores have Pillsbury playing 50...Rf2 here. But that can't be right since after 51. Kd3 Kh4 Lasker would have been able to play 52. NxR). After Pillsbury's 50...Rc2, the position was:
click for larger viewThe manner in which Lasker rebuffed Pillsbury's efforts to complicate and achieved a position by move 58 which should have led to a quick victory will be discussed in my next post on this game. |
|
Apr-19-18
| | KEG: Post X
Lasker's precise play during this stage of the game is a joy to behold: 51. Nd3!
"Very well played." (Reinfeld-Fine).
I fully agree with Reinfeld-Fine's assessment of 51. Nd3!, but disagree with their claim that 51. Na4 would have thrown away Lasker's win. Granted, Lasker's move was far better. But White still wins even with 51. Na4. Reinfeld-Fine claim that after 51. Na4 c5, White would lose with 52. Rg5 and that White would only draw with 51. Nxc5. They are wrong on both counts. Turning first to 52. Rg5 (after 51. Na4 c5), this does indeed probably blow White's win, but Reinfeld-Fine's claim that White would be lost after 52..d4 is absord. With 53. Rd5 White is clearly better, and Black's best chance lies in 53...Bf3 (53...dxc3 loses to 54. Rxc5 and the c3 pawn falls). More seriously, Reinfeld-Fine overlook White's best move after 51. Na4 c5...52. Rd6 which leaves White in control. The other move considered by Reinfeld Fine is 51. Rxc6. This move, though less precise than Lasker's 51. Nd3, also wins. Reinfeld-Fine claim that Black can draw after 51. Rxc6 Rxc3 ("threatening d4"). They are correct that the game would be drawn after the seemingly clever 52. Ne4? dxN 53. RxR+ Kf2 54. Rc7 e3 55. Rxa7 e2 56. Re7 e1(Q) 57. RxQ KxR, but pretty as this variation is, it overlooks White's simple win with 52. Kb4! Let's get back to the actual game after Lasker's excellent 51. Nd3! 
click for larger view51... Kh4?
Pillsbury would have had far better chances and been able to make Lasker's task far harder with 51...Rxc3, a move unfairly maligned by Reinfeld-Fine in their commentary on this game. After 51...Rxc3 52. Ne5 Kf4 53. NxB, Black does indeed get wiped out after Reinfeld-Fine's 53...Rg3?? 54. Ne5! But Pillsbury would hardly have fallen into such an elementary trap, and would very likely played the far better 53...Rc2. He would then have been down a piece, but the Rook Knight and two pawn against Rook and three pawn ending --though a theoretical win for White--would have presented hurdles even for Lasker. 52. Ne5
"Simpler than 52. Rxc6 d4 and Black has a passed pawn." (Reinfeld-Fine)(accord--Rosenthal in the Tournament Book). 52... Be5
53. Rxc6
click for larger viewLasker is again a pawn to the good. The end seems to be nearing. 53... Kg3
54. Rc5 Rd2
Desperation! Perhaps 54...Kf2 was better, but I see no real hope for Pillsbury even with that move. The position was now:
click for larger view55. Nc6
"To protect the a-pawn by Nb4 and at the same time attack the d-pawn." (Hoffer). The text does indeed accomplish everything Hoffer mentions and does indeed preserve Lasker's winning advantage. But the cute 55. Nc4! was a faster way to win. If then 55...dxN 56. RxB cxb3 57. axb3, White has an easily won Rook and two pawns against Rook and pawn ending (with a connected passed pawn). 55... Kf4
55...Bb1 was a better chance for Black.
56. Nb4
This is excellent, and far better than Reinfeld-Fine'suggested 56. Nxa7 which gives Black some chances after 56...Bb1. Perhaps best here for White is 56. Ra5, but Lasker's move is also completely convincing 56... d4
57. cxd4 Rxd4
58. Ra5
58. Nd5+ was also good.
58... Rd7?
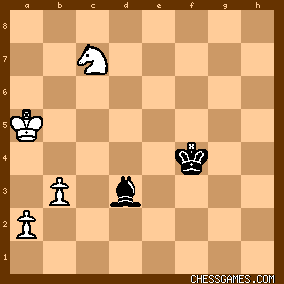
As the 60-move time control approaches, Pillsbury blunders. If he wanted to continue, he had to play 58...Rd6, though this would leave him two pawns down. After 58...Rd7?, the position was:
click for larger viewBut here, as I will discuss in my next post, Lasker missed [perhaps because of the looming 60-move time control] a way to close out the game immediately, and had to play to move 85 to finish off Pillsbury. |
|
Apr-19-18
| | KEG: Post XI
As Chancho and keypusher have already explained on this site, and as was pointed out long ago by Hoffer, in the diagrammed position with which I ended my last post Lasker "could have won the game at once with 59. Nd5+ because of 59...Kg5 [as Teichmann--who also identified 59. Nd5+ as a crusher-- noted, 59... Kf3 loses to 60. Nf6] 60. Ne3 Rf7 61. RxB+ which reduces to an easily won King and Pawn ending for White. But Lasker played:
59. Nc6
Now he had to battle on for another 26 moves. But the last word on this move should go to Hoffer: "If 59. Nd5+ we would have been deprived the [chance to observe Lasker's] method of winning the difficult ending that followed." After 59. Nc6, the position was:

click for larger viewLasker now wins Black's a-pawn, but the game gets reduced to a tough Knight and two Pawns against Bishop endgame which requires time, patience, and great skill to win. 59... Be4
Alternatively, Pillsbury might have tried 59... Bb1 or 59...Be6. In any case, Lasker still has his work cut out for him. 60. Nxa7 Rd2
61. Nb5 Rd5
61...Bb1 may have been better, though Lasker should still win after 62. Nc3. 62. Kb4 Bd3
63. Nc7 RxR
Pillsbury might have been able to extend the game a bit longer with 63...Rd7. 64. KxR
This left:
click for larger view64... Ke5
65. Kb4
65. a4 was probably faster.
65... Kd6
This ending is much harder to win than it first appears. Lasker had to remain alert to Pillsbury's two possible drawing themes: (A) trading off his Bishop for White's two pawns; and (B) stalemate. In what follows, Pillsbury tries both strategies, and Lasker is required to earn his win here yet again. As will be seen, it is easy to misplay this seemingly simple endgame. 66. Nb5+ Kc6
66...Kd5 was theoretically better, but at this stage Pillsbury is trying tricks. 67. a4
67. Nc3 would have been much faster, but Lasker's methodical advance of his pawns gives Pillsbury no chances--provided Lasker does not fall into one of the various traps Pillsbury is about to set for him. 67... Kb6
68. Na3
68. Nd4 was faster, but by now Lasker has his winning line in mind and is not about to be distracted. 68... Be2
69. Nc4+ Ka6
70. Kc3 Bd1
71. Nb2 Bh5
72. b4 Be8
73. Kb3 Bc6
74. Kc4 Bd7
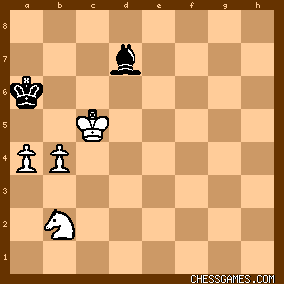
The position was now:

click for larger viewHow easy would it have been for Lasker to err here with 75. b5??. As Rosenthal noted in the Tournament Book, this would have allowed Pillsbury to draw with the cute 75...Ka5 76. Kc5?? (76. Nd3 or 76. Nd1 still win for White here) Bxb5! which would leave: 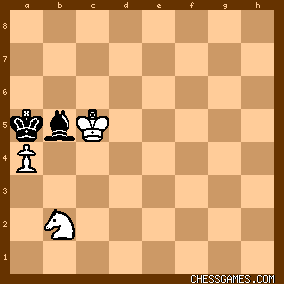
click for larger viewThe game is now drawn, since 77. axB is stalemate!! A neat little trap by Pillsbury. But Lasker did not oblige and played: 75. Kc5
This left:
click for larger viewAll seems good for Lasker here, but Pillsbury still had a trick or two up his sleeve as I will discuss in my next (and perhaps last) post on this game. |
|
Apr-19-18
| | KEG: Post XII
Pillsbury's final effort to fend off defeat is not apparent in the record of the game on this site, which gives an erroneous record of moves 79 through 82. As I will attempt to show here, Pillsbury had another clever trap planned for Lasker that at least warrants mention. Picking up from the final diagram in my last post: 75... Bg4
76. Nc4 Bd1
77. b5+ Ka7
78. a5 Bf3
79. Ne5 Bb7
The game score on this site gives this move as 79...Bg2, thus obscuring what remains of interest in this game. 80. Nc6+ Ka8
81. Kb6
The position was now:
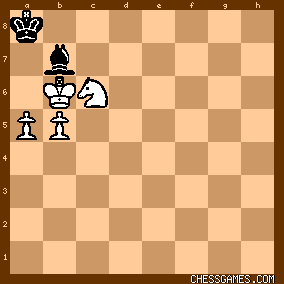
click for larger viewThe game score on this site has the Bishop on g2, and has Pillsbury playing the pointless 81...Bh3. What REALLY occurred, however, was far more interesting. 81... Ba6!
As Rosenthal noted in the Tournament Book, either 82. KxB?? or 82. bxB?? would be stalemate!! 82. Nb4
Lasker was wide awake, and didn't fall for Pillsbury's little trick. The balance of the game is of no real interest.
82... Bb7
83. Na6 Bf3
At this point, the game score on this site and that in the Tournament Book converge. 84. Nc7+ Kb8
85. a6
This left:
click for larger viewPillbury here resigned, assuring Lasker of first place in the Paris 1900 tournament. 1-0 |
|
Jan-12-19
 | | Sargon: <KEG: Post XII
Pillsbury's final effort to fend off defeat is not apparent in the record of the game on this site, which gives an erroneous record of moves 79 through 82. As I will attempt to show here, Pillsbury had another clever trap planned for Lasker that at least warrants mention. [...]>We've incorporated your corrections, and we'll add your full annotations at some point. Thanks for the valuable details and context. |
|
Jan-13-19
| | KEG: <Sargon>Glad you found my annotations of use. |
|
| Jan-15-19 | | HarryP: I've always been impressed by Pillsbury's playing the Dutch Defense in this crucial showdown with Lasker. He played the Dutch only twice in his career. The other time was against Albin in 1893. Lasker made an equally gutsy reply: the Staunton Gambit. A great game was the result. |
|
Jan-19-19
 | | offramp: <KEG>. one of your best! Many thanks. |
|
| Jan-19-19 | | sfm: After going wrong in the opening Black puts up an incredibly inspired and tenacious defense all the way to the end. |
|
| Jan-19-19 | | Pyrandus: Staunton Gambit = Anti-Holland System? |
|
| Jan-19-19 | | Ironmanth: Nice fight! Extensive annotations that I will devote time to; thanks! |
|
| Jan-19-19 | | The Kings Domain: Classic finesse in such a simply impressive game. The way both sides elegantly parry each others moves leaves a touch of Victoriana to it that makes the era so fascinating with the game. An expectedly distinguished gem by two great masters. |
|
| Jan-19-19 | | landshark: <offramp> Agreed - <KEG> annotations are fabulous! |
|
| Jan-19-19 | | newzild: An excellent game to play through.
Thanks to those who posted annotations below. |
|
| Jan-20-19 | | zanzibar: Below?! Must be a southern hemisphere effect! |
|
Jan-20-19
| | KEG: <landshark>Thank you. This was indeed a delightful game to replay and to analyze. <Ironmanth> So glad you enjoyed my annotations to this game. |
|
Jan-20-19
| | KEG: <offramp>Thank you. |
|
| Apr-17-19 | | newzild: <zanzibar> Isn't Zanzibar in the southern hemisphere too? |
|
 |
|
< Earlier Kibitzing · PAGE 2 OF 2 ·
Later Kibitzing> |
|
|
|


