keypusher: Part I
Mark Dvoretsky annotates this great game. (See http://www.chesscafe.com/text/dvore... .) I have a few comments in brackets. Some years ago, GM Vadim Zvjaginsev came up with a new plan for White in one variation of the French Defense, and suggested that I put his analyses to a practical test. We played two training games at a fast time control (15 minutes per game). Soon there would be another test, at the Russian Cup, against a well-known expert in the French Defense. 1. e4 e6 2.d4 d5 3.e5 c5 4.c3 Qb6 5.Nf3 Bd7 6.a3 Bb5 After this misfortune vs. Zvjaginsev, Sergey Volkov would switch to 6...a5!?. With this variation, he played a pair of resounding games (with varying success) against Evgeny Sveshnikov and Peter Svidler. <The Sveshnikov game does not seem to be in the database, but the Svidler game is well worth a look: Svidler vs S Volkov, 2003 .> 7.b4 cxd4 8.Bxb5+ Qxb5 9.cxd4

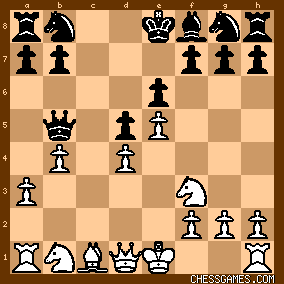
click for larger viewI was a regular on the black side of the French Defense, and was usually happy to rid myself of my "bad" light-squared bishop. These days, a space advantage is valued more highly than it used to be -- many people are happy to play the white side of such position. It's no accident that the 3.e5 system against the Caro-Kann has also seen a sharp rise in popularity, with its early exchange of Black's light-squared bishop. The diagrammed position occurred in both training games with Zvjaginsev. Black has the choice of either continuing quietly, as with 9....Nd7!? 10. Nc3 Qa6; or playing more sharply, starting with ...a7-a5. In our first game, I tried the tempting queenside break. 9...a5?! 10.Nc3
I continued 10...Qc4 11.Bd2 axb4 12. axb4 Rxa1 13. Qxa1, and here, I stopped to think. I had planned to continue 13...Bxb4 14.Qa8 Bxc3 15.Qxb8+ Kd7 16.Qxb7+ Ke8; but I established that White could easily bring his rook into the game, either by 17.Qa8+ Kd7 18.Qa3, or by 17.Bxc3 Qxc3+ 18.Ke2, when there would be nobody to protect my king. The search for an acceptable defense having proved fruitless, Black selected 13...Nc6 14.Qa8+ Nd8 15.Qa4+ Nc6 16.b5 Qxa4 17.Nxa4 Na7 (with the faint hope of defending the closed position after 18.b6 Nc6) 18.Ke2!, when Vadim confidently exploited his overwhelming lead in development. Volkov retreated his queen to a different square, but this did not change the way the game was going. 10....Qc6 11.Bd2 axb4 12.axb4 Rxa1 13.Qxa1 Qa6 14.Qa4+! (the same technique he used in our training game) 14...Qxa4 15.Nxa4 b5 15...Nc6 16.b5 would have transposed into a position from the training game. 16.Nc3! (much stronger than 16.Nc5 -- as in our game, Vadim aims for open lines) 16...Bxb4 17.Nxb5 Be7 <17...Bxd2+ seems worth a look> 18.Ke2 Nh6 
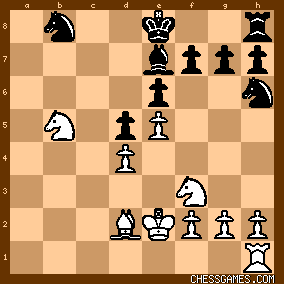
click for larger viewWhite's solid positional advantage is, first and foremost, because of the unfortunate placement of Black's knights. It's important not to allow them back into play. 19.Rc1 suggests itself; but after 19...0-0 20.Rc7 Bd8 would be ineffective: depending on how White continues, Black could reply with either ...Nc6, ...Bb6, or ...Nf5-e7. On 20. Na7 Black continues 20...Re8 (with the idea ...Nd7-b6) 21. Rc7 Bf8, followed by ...Nf5-e7, keeping a defensible position. After some thought, the grandmaster discovered an elegant plan, allowing him to deprive both enemy knights of their mobility. 19.Nb5-a7!!
Later, I examined another way that White could play this position, which was also very strong: 19.Ra1!? 0-0 20.Ra7. 20...Nc6 is quite joyless for Black: 21.Rc7 Rb8 22.Nc3 Rb6 23.Na4 Ra6 24.Rc8+ Nd8 25.Nc5 Ra7. And on 20...Bd8 21.Bb4 Nc6 (the simplest reply to 21...Re8 is 22.Ra8) 22.Bxf8 Nxa7 23.Bxg7, White comes out a pawn ahead. But the game continuation is evidently stronger still. | 


