KEG: Post II
The manner in which Pillsbury obtained the advantage after 21. Ke3 was remarkable--but, as Maroczy brilliantly went on to show--insufficient to overcome the equalizing power of opposite color Bishops. 21... Ra8!
Pillsbury contemplates a Queen-side attack. Who but Pillsbury would have imagined such a plan here? 22. a3
Maroczy made a few moves during this stage of the game that--while not fatal--made his task more difficult. Here, 22. a4 would have limited Pillsbury's options on the Queen-side. 22... g6
Pillsbury might also have tried 22...a4 immiediately (to exploit Maroczy's last move), or perhaps 22...g5. 23. Rd1
Since Maroczy has to move his Rook back to d2 on his very next turn, this was clearly loss of time. Still, as Maroczy seems to have calculated, opposite color Bishops allowed him to get away with this. 23. f3 (an advance Maroczy played on his 28th turn, seems simpler. 23... Bf5
"!"--(Tournament Book).
24. Rd2
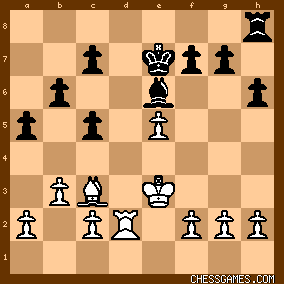
The position was now:
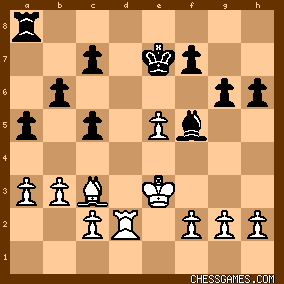
click for larger view24... a4!
The Queen-side assault begins! 24...h5 was another reasonable plan. 25. b4
The alternative, 25. Bb2, was hardly attractive. 25... cxb4
26. Bxb4+ c5
Pillsbury's pawns march.
27. Bc3 Rd8
Having achieved the Queen-side pressure he sought, Pillsbury was now prepared to trade Rooks. 28. f3
Giving Pillsbury another tempo. Maroczy could simply have played 28. RxR and probably have been fine. 28... RxR
28...h5 was a good alternative.
29. KxR h5
30. Bb2 b5!
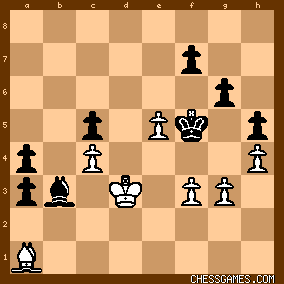
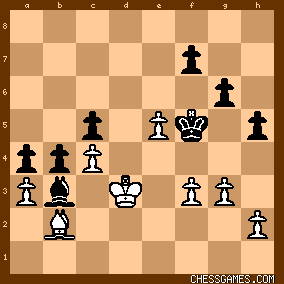
Pillsbury's Queen-side advance certainly looked formidable at this stage: 
click for larger viewHow should Maroczy deal with Pillsbury's threats? 31. c4
Though Maroczy survived, I suppose this move was OK. But it sure looks ugly. 31... b4!
The progress Pillsbury has made in the last ten moves is amazing. 32. Bc1
Maroczy, however, did not panic, and settled down to hold off his talented opponent. 32... Ke6
33. Bb2
Maroczy was in a holding pattern at this point. He was not going to give Pillsbury an inch. 33... Bb1
33...b3 or 33...g5 look stronger, but probably insufficient. 34. g3 Kf5
35. Ke2
Why not 35. h4 here? MarocY will soon provide an answer to this question. 35... Ba2
35...Bc2 looks like a better try, but attacking the c-pawn must have looked most attractive. The reason this plan got Pillsbury nowhere will not become apparent until Maroczy's 48th move. 36. Kd3 Bb3
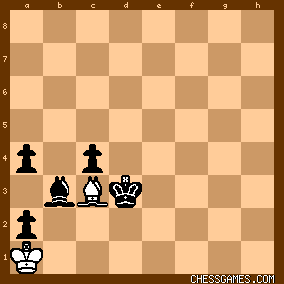
This left:
click for larger viewMatters certainly look grim for Maroczy here, but as I will discuss in my next post on this game, Maroczy from this point dazzles the viewer with his method of saving the game. Who would have imagined he had devised a drawing method that involved the sacrifice of no less than three pawns! |