Dec-26-20
 | | KEG: This game between two also-rans (if last-place Karpinski can be accurately so described) was jam-packed with excitement and some truly wretched play (including no fewer than four result-changing blunders in the final King-and Pawn ending). Stranger than fiction.
1. e4 c5
2. Nf3 Nc6
3. Nc3 e6
4. d4 cxd4
5. Nxd4 Nf6
6. NxN
A fairly lame but solid way for White to proceed against the Sicilian. 6... dxN

click for larger viewNeedless to say, 6...bxN is more usual and better. The text is analogous to moves Lasker sometimes made,confident he could defeat most of his opponents from a slightly inferior end-game position. As will be seen, neither Howell nor Karpinski could be confused with Lasker, Rubinstein, Capablanca, or Carlsen in the end-game play. 7. QxQ+ KxQ
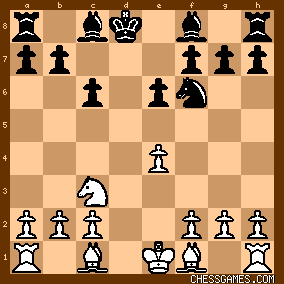
click for larger viewWhite obviously stands better. But Howell soon ruined that: 8. Bg5?
With 8. e5 or 8. Bf4, White would have a clear edge. The text gave Karpinski a chance to equalize: 8... Ke8
Which he promptly fumbled. He would have been fine with 8...Bd6 or 8...e5. 9. 0-0-0
9. e5 was best for White. Now, Karpinski could simply play 9...e5. But: 9... Bb4?!

click for larger view10. e5!
At last. Here, Karpinski decided to stake everything on wrecking White's Queen-side pawn formation" 10... BxN
10...Nd5 might be slightly sounder,but in the current position the text is certainly not a bad try by Black. 11. bxB
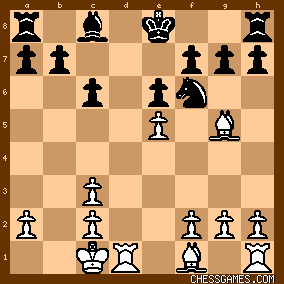
click for larger viewIf Black manages to trade down to a King and Pawn ending from here, he would have a won game. But there's a long way to go before that, and in the current position Howell had the two Bishops and the freer game (not to mention mate in one with Rd8 if the Black Knight moved anywhere other than d5 or d7). 11... Nd7
This avoids mate in one, but Black's position was now hardly a thing of beauty: 
click for larger viewThe only nice things I can say about Karpinski's position at this stage are: (i) he had the nicer pawn formations; and (ii) he was almost certainly not lost. This is the sort of position in which attacking genius' such as Fischer, Kasparov, and Carlsen would badger their opponents into submission. Howell, however, seemed to have no idea how to exploit his advantage, and by his 17th move he was worse (though with blunders by Karpsinski on moves 17 and 19, Howell probably likely had a won game). |
|
Dec-26-20
 | | KEG: Post II
12. Bc4
This accomplishes nothing. 12. f4 or 12. Bh4 (anticipating h6 by Black) were better. 13... b5
14. Be2 Bb7
Now Black can move his Knight without fearing Rd8 mate. 15. f4 Nb6
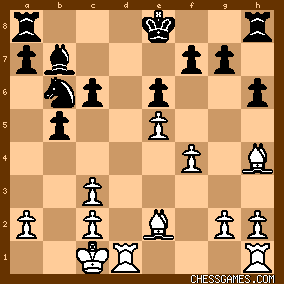
click for larger viewBad pawn structure and all, Howell was still somewhatr better. But he promptly ruined that. 16. Rd4
If Howell wanted to use his Rook on the d-file, 16. Rd6 was the move. Best of all, however, was the simple 16. Rhf1. 16... Nd5
17. Rhd1
Instead of leaving his c3 pawn undefended, Howell could have played 17. c4 or just 17. Kb2. After the text, the position was: 
click for larger viewMaybe Howell thought he could get away with this, since 17...Nxc3 now leads to mate in two after 18. Rd8+. But not even Karpinski could be expected to fall for that.7
With 18...g5, Black would now be better. But:
17... Kd7?
Walking into a pin on the d-file instead of doing something useful such as 17...g5 was not exactly sound strategy. And it soon got worse for Karpinski: 18. c4
Good, though 18. a4 was even better. But perhaps Howell somehow knew thar his a-pawn needed to hang back until it could be the hero of the game a few dozen moves later. 18... bxc4
19. Bxc4
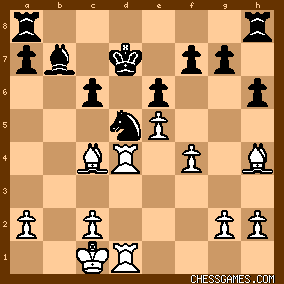
click for larger view19... Kc7?
Just awful. With 19...Rhd8 or 19...a5, Karpinski would have had a defensible position. 20. Be7! Ne3?
Black can possibly still survive with 29...Kc8. The text, which forks Rook and Bishop, however, may have appeared superficially attractive to Karpinski: 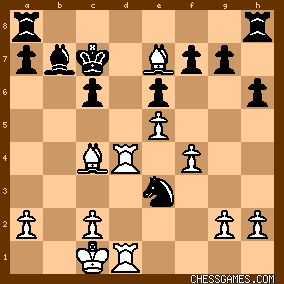
click for larger viewFor all the bad play, the position here was indeed interesting. How should White proceed? |
|
Dec-26-20
 | | OhioChessFan: <Post II
12. Bc4
This accomplishes nothing. 12. f4 or 12. Bh4 (anticipating h6 by Black) were better. 13... b5 >
I often play your analysis games over, don't often comment(twice today!) but wanted to point out you didn't include 12...h6 13. Bh4 |
|
Dec-26-20
 | | KEG: <OhioChessFan>Another good catch. Must be getting groggy for the holidays! Yes indeed, I omitted 12...h6 13. Bh4, a not unimportant omission given my suggestion of 12. Bh4. So glad you are such a close and careful reader! I appreciate such corrections! Thank you so much. |
|
Dec-26-20
 | | KEG: Post III
21. Rd7+
The crucial line is 21. R1d2 Nd5 22. Bd6+ (or maybe 21...Kb6 22. R2d3). If 21...NxB (after 21. R1d2, White is clearly much better--and maybe even winning--after 22. RxN. The text gives Black a reprieve.
21... Bb6
22. R1d4
Another second-best move by Howell, after which his theoretical winning chances were gone. His best play here was 22. R1d3 (since the Bishop isn't really hanging!) NxB (forced) 23. Rb3+ Ka6 (forced) 24. Rd4 Na5 (forced) 25. Ra3 c5 (best) 26. Rda4 Rhc8 27. RxN+ Kb6 28. g4 with pressure and some chances despite the bishops of opposite colors. 22... Bc8
Forced.
The position was now:

click for larger viewIn this position, Howell decided to gain time by repeating the position. He avoided the crucial line of 23. Bxe6 which I will discuss below: 23. Bd8+ Kc5
Forced
24. Be7+
Forced
24... Kb6
Forced
25. Bd8+ Kc5
26. Be7+ Kb6
The diagrammed position had now been reached a third time, and Karpinski (assuming the rules were as they are today) could have claimed a draw by triple repetition. But he (and Howell) chose to play on) 27. R7d6
The interesting line here is 27. Bxe6 which seems to lead to a fascinating position: 27...BxR (27...fxB? loses to 28. Rb4+ Ka6 [if 28...Ka5 29. Rd3] 29. Rd3 Nc4 30. RxN Kb7 31. Bd6 and White is up a pawn and Black is hopelessly tied down and clearly lost despite the Bishops of opposite colors) 28. BxB Nd5 29. Bd5 Rad8 30. Bg4 leaving: 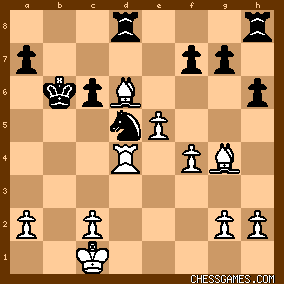
click for larger viewFor the sacrificed exchange, White has a pawn and two powerful Bishops and all sorts of dynamic chances. Probably Black would be best advised to return material with 30...RxB 31. dxR Rd8 32. d7 g6 where Black eventually wins back the pawn with a likely draw. Anyway, none of this happened, so let's rejoin the game after 27. R7d6: 
click for larger view27... Nf5
Forced.
28. Rd8 RxR
Black could also play 28...Ba6 29. RxR(h8) RxR 30. Rd8 RxR 31. BxR+ Kb7 32. BxB+ KxB 33. Kd2 Kb5 with a likely draw. 29. BxR+ Kc5
30. Re4
The last several moves were forced, and the following position was now reached: 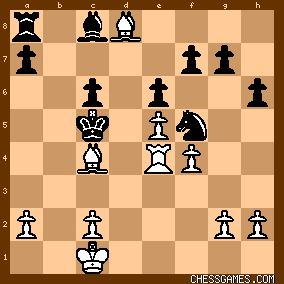
click for larger view30... Ba6
31. BxB RxB

click for larger viewIt might appear that the game was winding down to a draw. But in fact, the game was only about half over, and much of the action--for better or worse--was still to come. |
|
Dec-27-20
 | | KEG: Post IV
32. Bd3?
To avoid trouble, Howell just had to play 32. c3 to keep control of d4. Now, shockingly, Karpinski was able to obtain the better ending. 32... Rd4!
Of course.
33. RxR KxR

click for larger viewBlack has all the threats, but the game should be easily held by White with ordinary care. But, as will be seen, Karpinski overestimated his advantage, and managed to achieve a lost game in fairly short order. 34. Kd2
Obviously forced.
34... Ne7
Hoping to create trouble for White by posting his Knight ond5. 35. c3+
Howell had to play this now before Karpinski could get in Nd5. 35... Kc5
36. g3 Nd5
37. Bh7
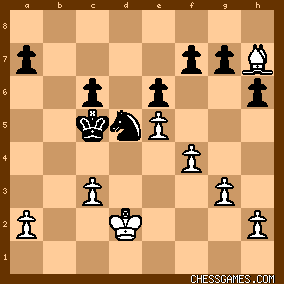
click for larger viewThis is not really much of a threat y White. Karpinski could just have played 37...f6 or, even easier, 37...Ne7. But Karpinski perhaps thought that HE was winning, and tried: 37... Kc4?
Miscalculating and pursuing a mirage (i.e., that his Knight and King can now pick up the White Queen-side pawns). 38. Bg8

click for larger view38... Nxc3?
Karpinski was probably lost after his last move, but this should have been fatal. He might have been able to survive with 38...g5. But Karpinski was apparently still overlooking a nasty Bishop skewer as I will point out in my next comment. 39. Bxf7

click for larger view39... Ne4+
Only here, it appears, did Karpinski realize that 39...Nxa2 loses the Knight to 40. Bxe6+. As will quickly become apparent, however, Howell was also operating under a mirage, and managed to convert a winning edge to a losing game within just a few moves, incredible as that may appear from this position. 40. Ke3 Nc5
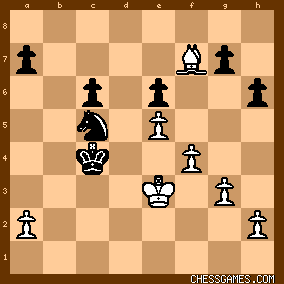
click for larger viewThis is actually a very tricky ending. I, like Howell, initially thought I saw a quick and easy win for White. But endgames require precision and careful analysis, and this one is no exception. What I failed to see in this position is the line Howell chose that actually manages to LOSE (or would have, had Karpinski kept his head). |
|
Dec-27-20
 | | KEG: Post V
41. f5?
I too thought this wins for White and only recognized my error when I got a few moves further. Stockfish confirmed that this move does indeed blow the win. I will explain presently why the text was a mistake. The winning move was 41. Bh5! (e.g., 41...Na4 42. Be2+ Kb4 43. Bf3 Kb5 (if 43...Kc5 44. Bg4 Kd5 45. Bd1! Nc5 46. Bf3+) 44. f5! 41. Bg6 also seems to win for similar reasons. But let's follow play after 41. f5? and see what's wrong with Howell's move: 41... Kd5
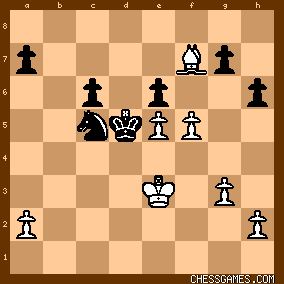
click for larger viewThe win now sure looks easy. Just trade down to a King and Pawn ending, play Kd4, win the c-pawn with the use of tempi, pick up the Black a-Pawn, and then Queen the White a-pawn. But...: 42. fxe6 Nxe6
43. Bxe6+ Kxe6
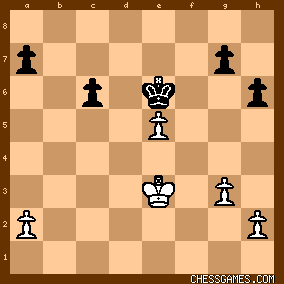
click for larger viewOnly here did I count and realize that this position is one of the cruelties of endgame play (of the order of unfairness of the fact that two Knights cannot mate an un-cooperating King). Yes, White can Queen, but: [sorry for the long variation, but there is no other way]] 44. Kd4 h5! 45. a4 g5 46. a5 h4 47. Kc5 Kxe5 48. Kxc6 Kf5 49. Kb7 Kg4 50. Kxa7 Kh3 51. gxh4 (51 a6 Kxh2 52. gxh4 g4 53. Kb8 g3 54. a7 g2 55. a8 (Q) g1 (Q) with a book draw) gxh4 52. a6 Kxh2 53. Kb8 Kg1 54. a7 h3 55. a8(Q) h2 leaving: 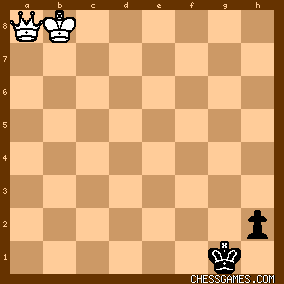
click for larger viewThis is one of these cruel positions I mentioned above. White cannot win! I don't know if Howell figured all this out, but for whatever reason, instead of playing 44. Kd4 (which as it turns out results in a draw with best play) chose: 44. Ke4??
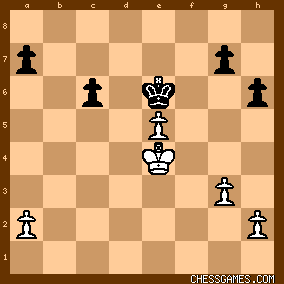
click for larger viewTakj about cruelty in the endgame, this move not only doesn't win...it actually loses since Black can now play: 44... c5
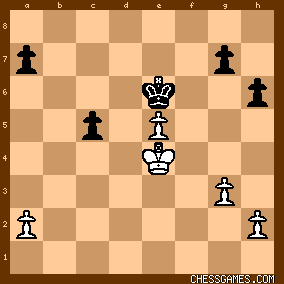
click for larger viewBeing unable to move his King to d4, White is sunk. It is now just a matter of counting. White eventually will have to abandon e4 and is thus doomed. 45. a3
As good or bad as anything:
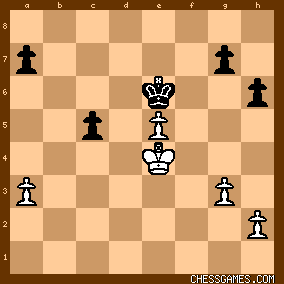
click for larger view45... g6?
This blows the win, as we will see. The winning moves were either 45...h5 or 45...g5; e.g.: 45...h5 46. a4 (if 46. Kf4 Kd5 47. a4 c4) g5 47. a5 a6 48. h3 h4 49. gxh4 (49. g4 c4 50. Kd4 c3 51. Kxc3 Kxe5) gxh4 and White is in Zugzwang. 46. a4
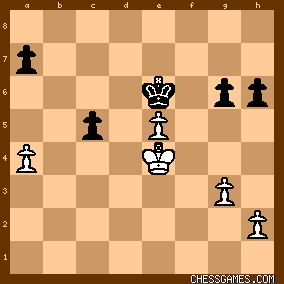
click for larger viewIt looks as if Black can win here. But, as it turns out, White can use the Rook-pawn stalemate motif to save himself. Karpinski avoided these drawing lines--and adopted a plan that actually loses! |
|
Dec-27-20
 | | KEG: Post VI
It looks as if Black wins easily, but: 46...h5 47. a5 g5 48. h4 gxh4 49. gxh4 a6 50. Kf4 c4 51. Ke4 c3 52. Kd3 Kxe5 53. Kxc3 Kf4 54. Kd4 Kg3 55. Ke5 Kg4 56. Ke4 would leave: 
click for larger viewOops. White saves the game by forcing stalemate. So the game was a draw, right?
But let's go back to the position after 46. a4:

click for larger viewThere is no way for Black to win, as we have seen, but Karpinski found a way to lose: 46... a5

click for larger viewNow it is just a matter of counting. White wins with 47. h3 h5 48. h4 c3 49. Kd4 c3 50. Kxc3 Kd5 (or 50...Kxe5 51. Kc4 Ke4 52. Kb5 Kd5 53. Kxa5 Kc5 54. Ka6 (to escape the stalemate trap) Kc6 55. Ka7 Kc7 56. a5 [Zugzwang--Black must allow the White King to escape after which White wins] 51. e6 Kxe6 52. Kc4. But instead of playing this winning line, Howell played: 47. g4?

click for larger viewNow Karpinski had another chance. He could draw with 47...h5 48. gxh5 gxh5 49. h4 c4 50. Kd4 c3 51. Kxc3 Kxe5 52. Kc4 Kd6 53.Kb5 Kd5 54.Kxa5 Kc5 55. Ka6 Kc6 56. Ka7 Kc6, etc. But instead, he played:
47... g5??

click for larger viewNow there was no escape for Black:
48. h3!
Zugzwang again!
48... c4
49. Kd4 c3
50. Kxc3 Kxe5
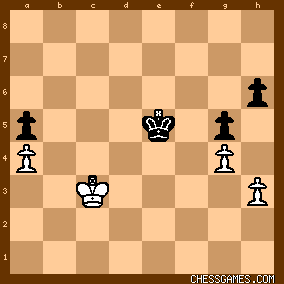
click for larger viewAnd yet again, a position that is just a matter of counting. 51. Kc4 Kf4
51...Ke4 does not save the day: e.g., 52. Kb5 Kd5 53. Kxa5 Kc5 54. Ka6 Kc6 55. Ka7 Kc7 56. a5 and yet again Zugzwang allows the White King to get loose and run over to the King-side and win) 52. Kb5 Kg3
53. Kxa5 Kxh3
54. Kb5 Kxg4
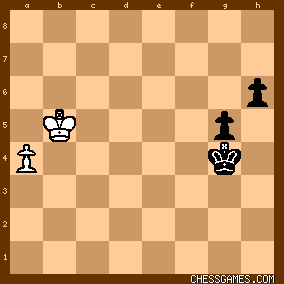
click for larger viewBlack has an extra pawn,but White gets a Queen and wins. 55. a5 h5
56. a6 h4
57. a7
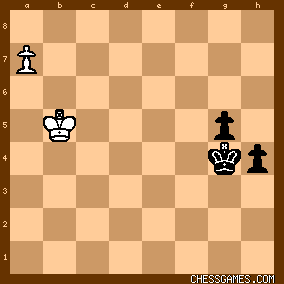
click for larger viewGame over:
57... Kg3
58. a8 (Q) g4
59. Qh1 h3
60. Qg1+ Kh4
61. Qf2+
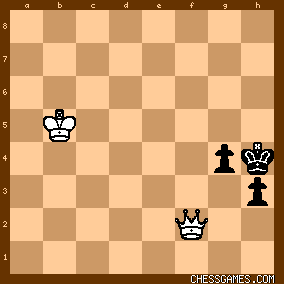
click for larger view1-0 |
|
|
|
|


