Apr-04-12
 | | Peligroso Patzer: This game is analyzed as Game #16 in the recently-published book, <The Greatest Ever chess endgames> (<sic>), by Giddins, Steve, Everyman Chess ©2012, at pp. 74-78. I highly recommend this book, both for its selection of games and its very instructive analysis and commentary. The ending in this game is fascinating and instructive. In the position after <78. … Kxc5>: 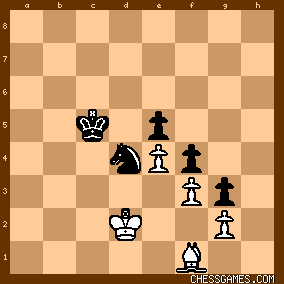
click for larger view
… one interesting feature is that Black cannot win by exchanging minor pieces unless he first wins a pawn because of stalemate resources. To illustrate, in the position arising a few moves later (after <85. Be2+>): 
click for larger view
… if one (for sake of comparison and analysis) removed the pair of g-pawns, Black could win from the altered, hypothetical position by continuing 85. … Nxe2 86. Kxe2 Kc3, and then outflanking the White King. However, in the actual position (with a White pawn on g2 and a Black pawn on g3), if the minors were exchanged, the White King could then run into the corner (h1), and Black could <stalemate> White, but could not win. |
Apr-04-12
| | Peligroso Patzer: Also very interesting is the position after <79. Kc3>: 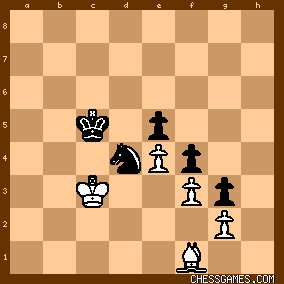
click for larger view
… which is a type of zugzwang. In order to make progress, Black must “lose a move”. Normally in minor piece endings, this is often possible for the side with a <Bishop playing against a Knight>, but not possible <absent extraordinary conditions> for the side with a <Knight playing against a Bishop>. Fortunately for Jakobsen, the far-advanced Black pawn-chain creates the requisite extraordinary conditions. With the Black Knight on d4, if the White Bishop moves away from controlling g2 (except to e2, only possible, of course, when the White King controls that square), the sacrifice <… Nxf3> will win; similarly, after the move Jakobsen played from the position in the above diagram (<79. … Kb6>), if White had maintained direct opposition with <80. Kb4>, Black would have won quickly with <80. … Nc2+> and <81. … Ne3>. With White’s normal methods for preventing Black’s making progress thus unavailable in the specific position, Black was able to proceed with the following King triangulation manoeuvre: <79. ... Kb6 80.Kd2 Ka5 81.Kc3 Kb6 82.Kd2 Kc6>, bringing about this position: 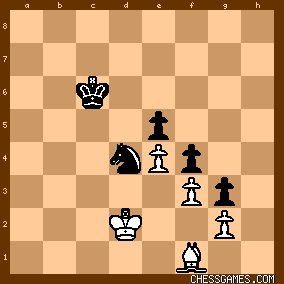
click for larger view. If White had now played <83.Kc3>, then <83. ... Kc5> would have brought about the position from the previous diagram <but with the move transferred to White>, i.e., with Black having succeeded in “losing a move”, the task that is usually imposible with N vs. B. (Note: In the actual game, since <83.Kd3 Kb5> would have enabled Black to make progress by an outflanking manoeuvre, rather than any King move, Torre played a Bishop move at #83, hoping to find a saving defense by bringing that piece to a more active square. Ultimately, of course, the White defenses failed.) |


