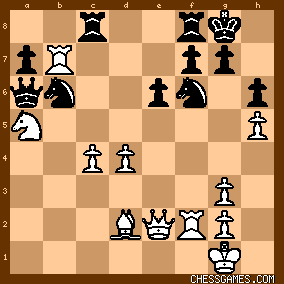
Abdel Irada: <<•>Of Target Squares and Doomed Defenders<•>>Chess intuition is a funny thing. Of course, like everything else in the game, it is mostly a matter of pattern recognition; sometimes, though, it can strike with as little apparent logical cause as divine inspiration.
In this case, the former is all that's needed. Here are four signs that Black is cast in the not-so-coveted role of Doomed Defender.
1) <The kingside pawn formation.> Think back. How many of our puzzles have been set with the Doomed Defender's pawns on e6, f7, g7 and h7 or h6? With rare exceptions, when we see *this* pattern, we begin to lick our tactical chops in anticipation.
2) <The kingside piece formation.> How often, also, do we find the DD's pieces as generically soundly placed, but as vulnerable in the *specific* position, as are his pawns: king on g8, rook on f8, knight on f6?
3) <The queen en route to Delta Quadrant.> This is a particularly extreme example, and therefore particularly instructive of its kind. Note how many safe squares the black queen has available to her. Now note how long it will take her to complete the Transgalactic Detour and make her way to the kingside to defend.
4) <The target square.> Here, too, we have an instructive example. Look at that knight on f6: To take it is to shatter the black kingside under extremely favorable conditions (see items 1-3). Surely this is worth at least an exchange?
Of course, to say this is one thing; to prove it, another.
<<•> 27. Rxf6! ... >
Now, of course, Black is not obliged to take the rook. He has his own threat on c4; let's see what happens if he ignores the offer and carries it out.
< (1) 27. ...Nxc4
28. Rf4  >
>
The key here is to realize that Black threatens nothing. His knight is pinned, and if the queen moves to d6 (the only square she has) to remove the pin, White quietly removes the knight and wins comfortably.
It is probable that a further sacrifice at this point would also win, but it is unnecessary, for the game *is* won.
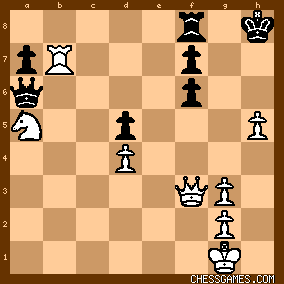
<<•> (2) 27. ...gxf628. Bxh6 ... >
This threatens mate on g7 in two moves. (Note how much Black's queen can do to help.)
<<•> 28. ...Kh8 >
Somewhat worse is
(a) 28. ...Kh7 29. Qg4...
+(a.1) 29. ...Rg8 30. Rxf7†...
++(a.1.1) 30. ...Kh8 31. Bg7†, Kh7 32. Qg6#.
++(a.1.2) 30. ...Kxh6 31. Rxf6†, Kh7 32. Qe4†...
+++(a.1.2.1) 32. ...Kg7 33. Qg6†, Kh8 34. Qh6#.
+++(a.1.2.2) 32. ...Kh8 33. Rh6†, Kg7 34. Rh7† and mate in five.
+(a.2) 29. ...Kxh6 30. Rxf7!, Rg8 31. Rxf6†, winning by transposition into line (a.1.2).
<<•> 29. Qg4, Rg830. Qf4 >
Without analyzing to mate, we can say this: White threatens a fatal infiltration with 31. Qxf6†, and pushing the pawn does no good, for White then checks on e5 and worms in anyway. Meanwhile, the threat of 31. Rxf7 is also in the offing.
There is incidentally an amusing defense in which Black can defer his destiny:
< 30. ...Nd5 31. cxd5, Rc1† 32. Kh2, Rf1 33. Qc7, Qe2 34. Qxf7, and White gets through first. >
The Doomed Defender has only this one deliverance: to hope for none.